Cleaning Tips, Guides & Resources
How to Prepare For End of Lease Cleaning

Preparing for an end of lease clean isn’t just about making the property look tidy for the next occupants. For most tenants, it’s about reducing the risk of cleaning-related bond deductions. To avoid this, tenants must ensure the property meets the requirements of an outgoing inspection report at the end of their lease. This inspection is usually conducted by the property manager and is often very meticulous, meaning bond disputes can arise even over minor details.
Common issues include grease inside the oven, dust on skirting boards, mould in bathrooms, dirt along window tracks, and stained or foul-smelling carpets. These issues may seem small, but they can easily delay the return of your bond.
The good news is that most of these problems are preventable with the right preparation. Starting early, understanding what agents pay more attention to during inspections, and knowing when to book professional end of lease cleaners, makes the entire process easier to manage.
In this guide, MaidForYou walks you through a simple preparation timeline, an inspection-style checklist, and helpful tips to maximise your chances of getting your full bond back.
The Right Timeline to Prepare for End of Lease Cleaning
One of the most common mistakes tenants make is leaving the entire bond cleaning process until the last minute. Unlike regular house cleaning, end of lease cleaning is much more detailed, and if rushed, areas may be missed that will not go unnoticed by agents during the inspection.
Dividing tasks over the days leading up to the inspection makes the job much easier and helps ensure nothing important is overlooked. Here’s our recommended timeline to help you prepare efficiently for your end of lease clean.
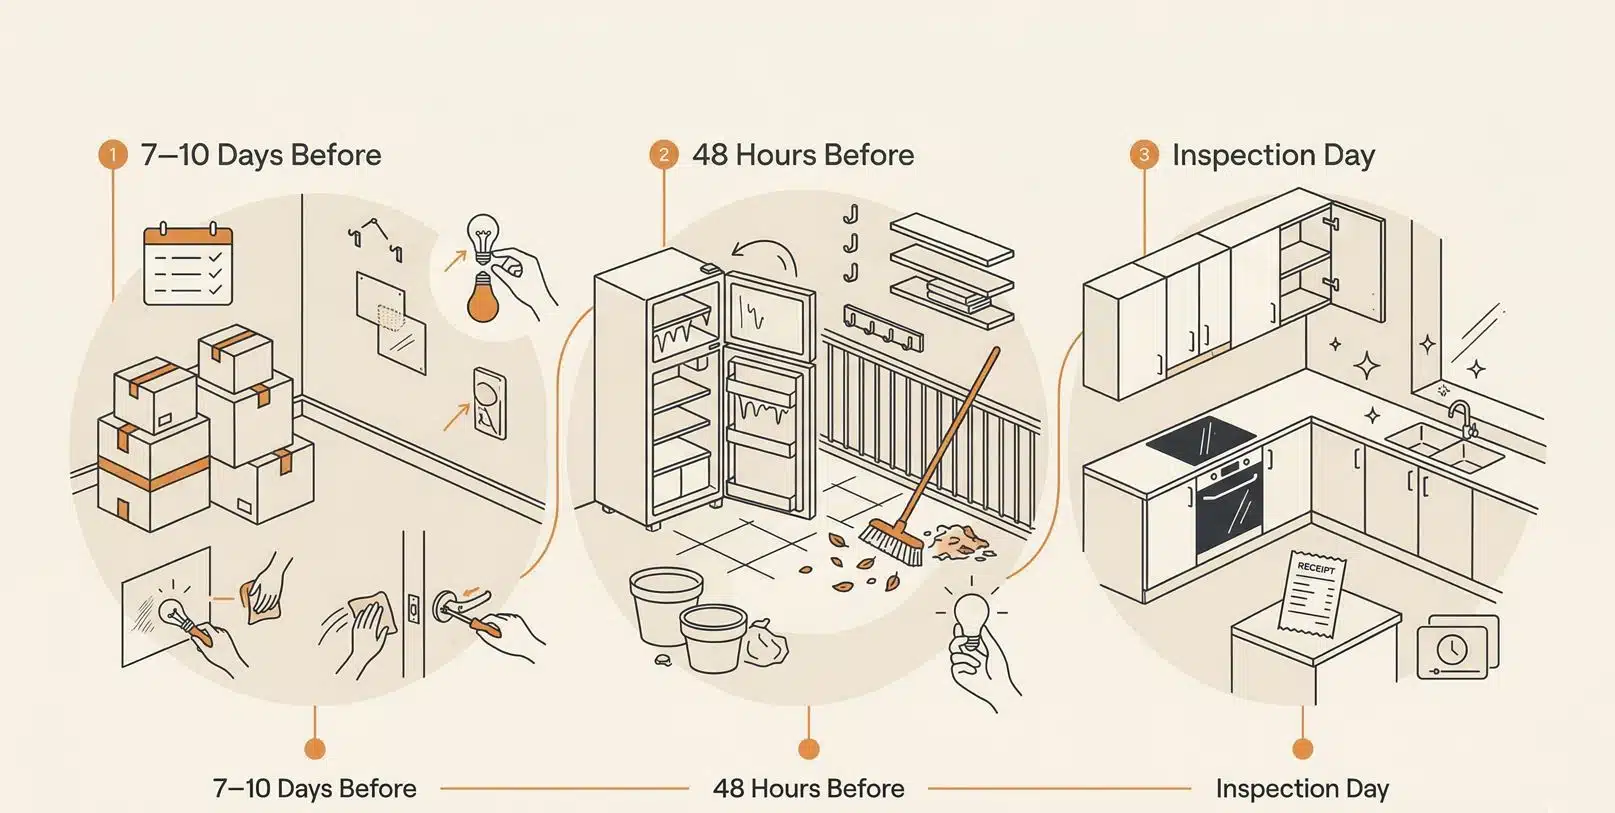
7–10 Days Before Moving Out
Anywhere between a week and 10 days is an ideal time to begin preparing the property. At this initial stage, the focus isn’t on deep cleaning the property, but on getting it ready for the final clean so the process can be quicker and more thorough.
The first thing to do is declutter. As you begin packing, try to keep as few items lying around as possible, and keep them organised neatly in one corner of the room. Once furniture, boxes, and knickknacks are cleared from living spaces, it becomes much easier to access and clean surfaces like skirting boards, cupboard interiors, window tracks, and floor edges where dust tends to collect.
This is also the perfect time to address any minor repairs. During an inspection, property managers note small issues that tenants often ignore or forget about.
Some simple tasks that are best addressed early include:
- Filling small nail holes
- Removing adhesive hooks or wall mounts
- Replacing blown light bulbs
- Wiping scuff marks from walls (unless you have requested professional wall washing)
- Tightening loose handles or fittings
Tackling these small details early saves you the time, trouble, and stress of doing them all at the last minute.
If you plan to hire a professional bond cleaning service, shortlist a few companies and discuss your requirements before finalising your booking. Bear in mind that tenants and property managers alike schedule end of lease cleaning services towards the end of the month, when many leases finish at the same time. To ensure availability, it’s best to book the service during this initial stage.
48 Hours Before the Final Clean
Two days before the final inspection, the property should be ready for a deep top-to-bottom clean. Whether you are cleaning the home yourself or hiring professional bond cleaners, there are a few steps you can take to make the process smoother.
If your rental property came with a fridge or freezer, make sure it has been defrosted before cleaning. This is important as it allows any water to drain fully and ensures the appliance can be properly cleaned and dried before the exit inspection.
During this stage, removable fixtures like wall hooks, temporary shelves, or adhesive fittings should be taken down so the wall can be cleaned more thoroughly. Depending on your lease agreement, outdoor areas including balconies, patios, and small courtyards may or may not be included in the inspection. If they are, tenants are expected to leave them tidy and reasonably clean.
For outdoor spaces, a few things you can do before the final clean include:
- Sweep balconies or patios
- Clear out leaves or debris
- Remove old pots, rubbish, or personal items
The last thing to do is check that all the lights are working and replace any dead bulbs. Most property managers test the lights during inspections, and if they find any blown bulbs, they will mention it in the report.
On the Day of the Inspection
By the time inspection day arrives, the property should already be completely cleaned. That said, it’s highly recommended to do a quick walkthrough before handing over the keys to ensure no small details have been overlooked. Check that surfaces are dust-free, cupboards are empty, walls are clean and free of damage, bathroom and kitchen surfaces are spotless, and all rubbish has been removed.
Some property managers ask for proof of professional carpet cleaning, particularly if it is specified in the tenancy agreement. Therefore, it’s a good idea to keep cleaning receipts and documentation ready.
Having a set of timestamped photos before leaving the property can also provide peace of mind because you’ll have evidence of the property’s condition when you vacated it, should there be any cleanliness-related issues in the final report.
The Agent-Grade End of Lease Cleaning Checklist
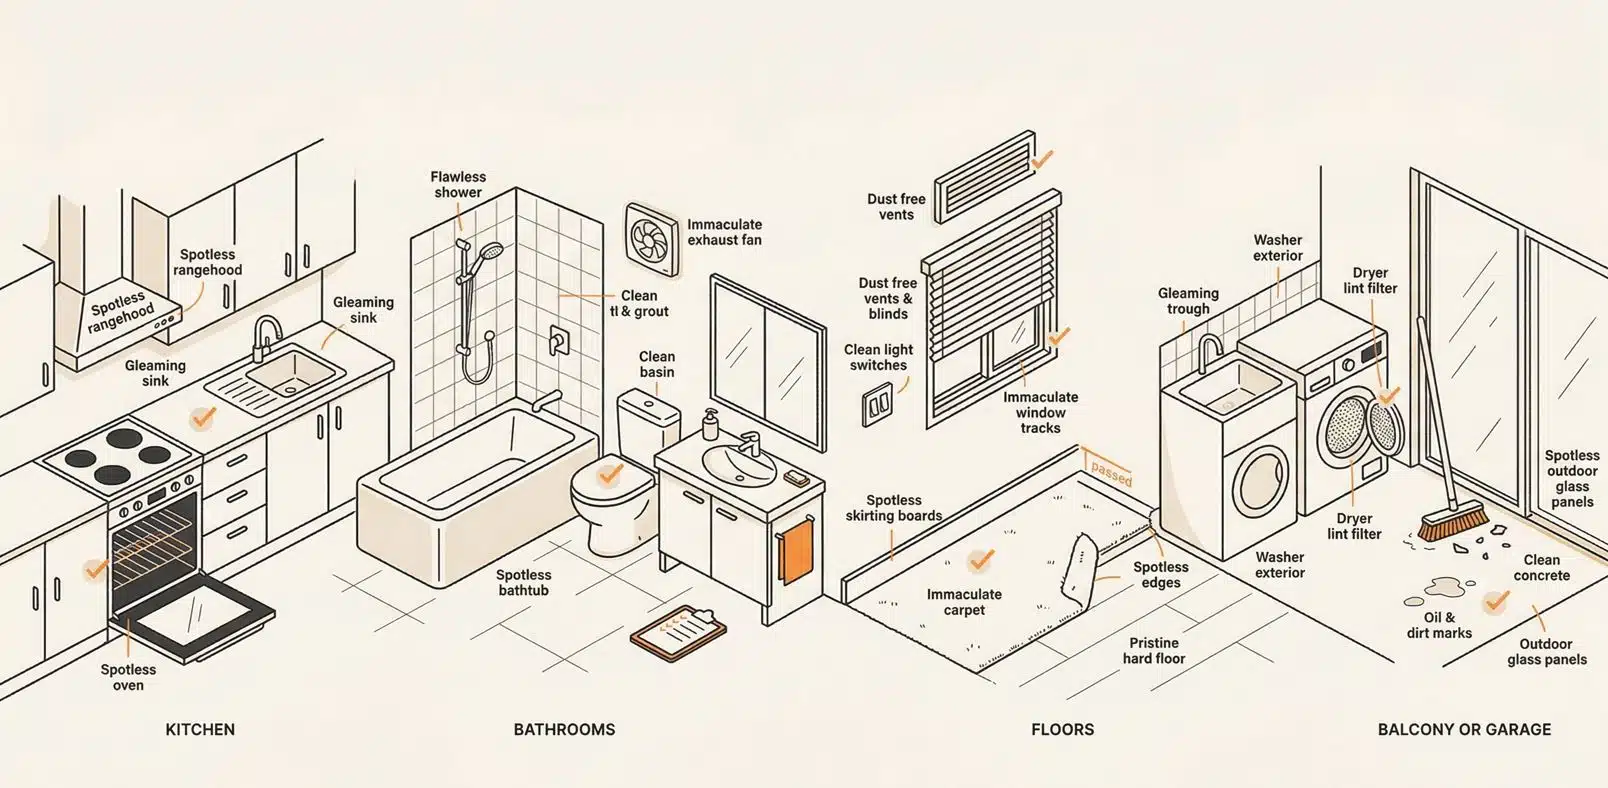
While agencies may have slightly different checklists, they are generally structured in a similar way and cover many of the same areas. Agents tend to focus more on small details that are easy to overlook during routine cleaning and often find fault in these areas.
Below, we’ve shared an inspection-style checklist based on the areas most commonly flagged during an outgoing property inspection.
Kitchen
-
Oven and cooking areas
- Oven interior and racks
- Baking trays and grills
- Stovetop and burners
-
Rangehood
- Rangehood filters
- Exterior surfaces
-
Cupboards and drawers
- Interior shelves
- Doors and handles
-
Appliances and fixtures
- Dishwasher filter
- Splashback tiles
- Sink basin and drain
- Exterior surfaces and handles
Kitchens are often the most scrutinised area because they are prone to grease and food residue buildup.
Bathrooms
-
Shower and bath
- Wall tiles
- Tile grout
- Silicone seals
- Shower screen edges
-
Ventilation
- Exhaust fan
- Ceiling vents
-
Vanity and storage
- Vanity drawers inside and outside
- Mirrors and glass surfaces
-
Toilet area
- Toilet bowl and seat
- Toilet base and surrounding floor
Bathrooms often require extra attention because moisture and soap residue can lead to mould growth.
Whole Home Surfaces
-
General surfaces
- Skirting boards
- Doors and door frames
- Door handles
-
Electrical fittings
- Light switches
- Power points
- Conduit wiring
-
Upper surfaces
- Ceiling fans
- Light fixtures
- Air-conditioning vents
-
Windows
- Blinds or other window treatment
- Window tracks
- Window frames
These smaller details are easy to overlook but frequently appear in inspection reports.
Floors
-
Carpeted areas
- Stains
- Embedded dirt
- Carpet odours
- Carpet edges
-
Hard floors
- Surface debris
- Stains or marks
- Sticky residue
Floors are inspected minutely, particularly along edges and in corners, and expected to be immaculate.
Laundry
-
Laundry fixtures
- Laundry trough
- Tap fittings
-
Appliances
- Washing machine exteriors
- Dryer lint filter
- Surrounding areas of washer and dryer
Laundry areas may be small, but they are included in inspection reports and often get flagged for one or more of the areas mentioned above.
Balcony or Garage (if applicable)
-
Balcony
- Flooring
- Leaves and debris buildup
- Outdoor glass panels
-
Garage
- Flooring
- General debris buildup
- Surfaces with oil or dirt marks
Even though these spaces are sometimes overlooked, they are still part of most final inspections.
DIY vs Professional End of Lease Cleaning
One of the first decisions tenants need to make at the end of their lease is whether to clean the property themselves or hire professional cleaners. For most tenants, the right choice depends on the property’s condition and how much time they have before the inspection.
A DIY clean can work well for smaller homes or newer apartments that have been maintained carefully throughout the tenancy. If the kitchen has minimal grease, the bathrooms are in good condition, and there are no carpet stains, it’s possible for a thorough DIY clean to meet inspection standards.
There are, however, situations where professional cleaners are the better choice, especially if you want to increase the chances of getting your full bond back.
Professional bond cleaning is generally recommended when:
- You have pets or children, which increases wear and dirt buildup
- It’s an older home and tougher to clean thoroughly
- There is visible mould or heavy grease buildup
- Carpets are stained or have strong odours
- You have little time before the scheduled inspection
One of the biggest advantages of hiring professional cleaners is their experience with property managers and their expectations. They also follow structured end of lease checklists to ensure nothing is missed.
Why Carpet Cleaning is Best Left to the Professionals
Among the many different end of lease cleaning tasks, carpet cleaning is one area where professional equipment makes a significant difference. While carpet steam cleaners can be rented, they must be used correctly to remove deeply embedded dirt or moisture from carpet fibres. More importantly, these machines need to be operated carefully to avoid damaging the carpet.
Cleaning businesses use professional hot water extraction equipment, which removes contaminants from deep within the carpet pile, including:
- Embedded dust and dirt
- Food and drink stains
- Pet odours and allergens
Because of this, professional carpet cleaning is mandatory in some lease agreements.
Keeping Receipts and Proof of Cleaning
If you’ve chosen to hire professional end of lease cleaners, regardless of whether it is outlined in the lease terms, having proof of the service is helpful, especially during the bond return process.
Keeping receipts for professional cleaning services shows that you’ve taken steps to return the property in good condition. Professional carpet cleaning receipts are especially important as they prove the correct equipment and techniques were used.
It’s also advisable to take timestamped photos of every room and different areas immediately after the final clean, including the kitchen, bathrooms, floors, and main living spaces. This is enough to provide a clear record of the property’s condition when you vacated it.
If issues arise after you move out, these photos can help clarify any misunderstandings surrounding your bond refund.
Common Reasons Cleaners Get Blamed
Common misconceptions about bond cleaning can lead to cleaners being blamed for issues that are outside their responsibility. In fact, many tenants assume the service was done poorly when something has been flagged in the report, but the issue may be unrelated to cleaning. One such example is permanent stains. While cleaning takes care of dirt, grease, and residue, some old or severe staining cannot be removed. Burn marks inside ovens, deep carpet stains, or etched marks on glass may remain even after professional cleaning.
Another situation involves mould, which typically can be removed if the growth is relatively fresh. On the other hand, long-term exposure to mould may leave staining on silicone or grout, leading to permanent discolouration. In these cases, the material needs to be replaced altogether as cleaning won’t help.
Areas that are flagged due to normal wear and tear are a common reason why bond disputes occur. Over time, paint may fade, small scuffs can appear on walls, and fixtures may naturally age. However, these changes are part of a property’s normal lifecycle and cannot be restored by cleaning alone.
Final Thoughts
Preparing for an end of lease clean becomes much easier when you plan and organise it in advance. Starting early to reduce clutter and understanding what property managers actually check during an inspection can significantly reduce the risk of bond deductions.
Whether you choose to clean the property yourself or hire professionals at a cost, focusing on the smaller details makes a huge difference to the final outcome. Kitchens, bathrooms, skirting boards, window tracks, and carpets are among the most common areas where problems arise.
With a comfortable timeline to prepare for the inspection, a structured cleaning checklist, and documentation in the form of timestamped photos and receipts for professional cleaning, most tenants can make the entire process smoother and avoid bond deductions or delays.

Adriana Aziz is the operations manager at MaidForYou. With over 6 years of experience managing cleaning operations, she knows all the best hacks when it comes to cleaning residential and commercial buildings. With expert experience in managing house cleaning operations, interior design and logistics. She spends her free time with her family and as a freelance food critic.
Leave a Comment
You must be logged in to post a comment.
Total Comments: 1

As seen on...


We’re Committed To 200% Customer Satisfaction Each And Every Time
If you’re not happy with our work, we make it right!


Absolutely love how organised and practical these tips are! Preparing ahead really does make end of lease cleaning smooth and stress-free.