Cleaning Tips, Guides & Resources
Remove Limescale and Have Your Shower Screen Looking Brand New

Among the different rooms and areas to clean in a house, the shower is often one of the biggest tasks to tackle. While there are several issues to deal with, such as soap scum and dirty grout lines, limescale is one of the most common problems in bathrooms. What starts as a few faint water marks can gradually turn into stubborn limescale that dulls shower screens, makes the space look unclean, and takes more time and effort to remove.
Limescale build-up is most commonly found on the shower screen and other fixtures in the shower like the soap dispensers, shower faucets, and shower heads. If you’ve ever tried wiping away limescale, you already know how frustrating it is because standard cleaning doesn’t effectively remove it. The good news is you can get rid of that unsightly limescale from your shower using the right cleaning method.
This guide breaks the process down into simple, practical steps, while also helping you determine when DIY cleaning is enough and when it’s time to rely on professional expertise.
What Causes Limescale in Showers
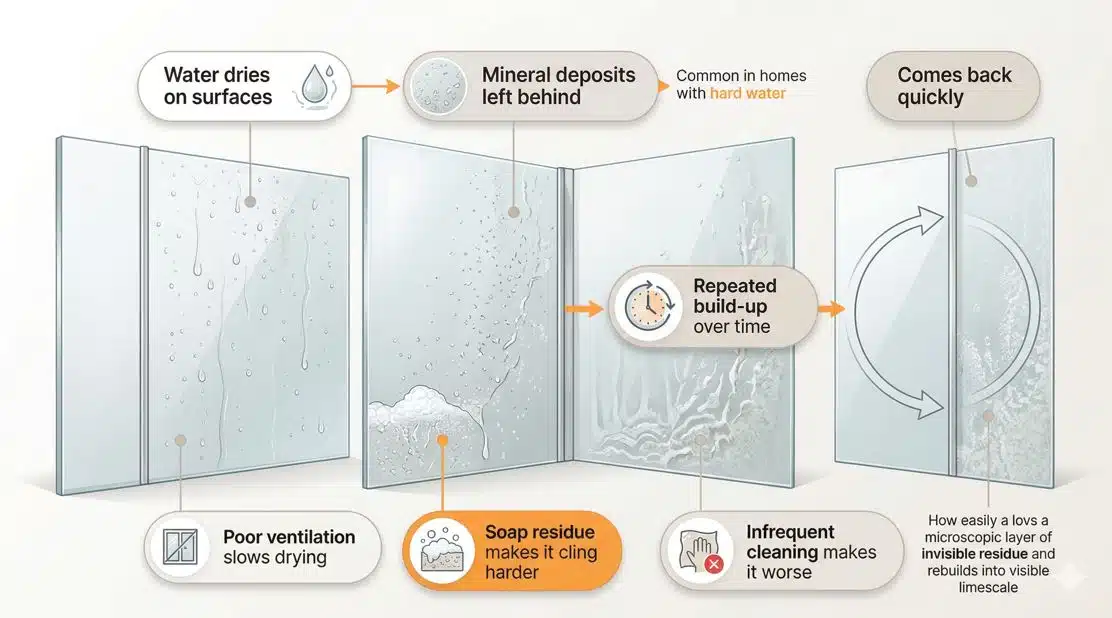
Limescale forms as a result of everyday shower use, particularly in homes with hard water. When water splashes on your shower screen and dries, it leaves behind tiny mineral deposits. Over time, these deposits build up into visible marks and, eventually, turn into hardened residue.
Limescale builds up even faster if your bathroom and shower aren’t cleaned regularly, while soap residue combined with minerals causes it to stick to surfaces even harder. Lastly, bathrooms with poor airflow or ventilation slow down the drying process, making showers more prone to limescale.
Even if your shower looks clean at a glance, these factors are constantly at play, which is why limescale tends to come back so quickly.
How Bad is Your Limescale?
Before you start cleaning, assess the surface to understand the severity of the build-up. This helps you choose the right approach instead of wasting your time and effort on cleaning methods that won’t get rid of the limescale.
- Light build-up (hazy film):
This appears as a faint, cloudy layer on the glass and is typically noticeable when light hits it at certain angles. A hazy film isn’t hardened, which makes it easier to wipe off with the right solution.
Best approach: DIY - Moderate build-up (visible spots):
At this stage, you’ll see clear white spots, streaks, or patches that don’t come off with a basic wipe. This is because the minerals have already started sticking to the surface and require an appropriate cleaning solution to break them down.
Best approach: DIY - Heavy build-up (chalky, crusted):
This is when limescale becomes thick, rough, and sometimes uneven across the glass. It may feel gritty or raised to the touch and can be difficult to remove without specialised tools or experience.
Best approach: Professional
Understanding the condition of your shower screen is important, as using the wrong method often ends up wasting time, effort, and resources. Similarly, while DIY methods can be effective, there are some severe cases that call for professional expertise to safely restore your shower screen’s clean finish.
DIY Methods That Actually Work
If you’re dealing with light to moderate limescale on a shower screen, there are simple do-it-yourself methods that are very effective in removing it. The key is applying them correctly and giving them enough time to work, rather than rushing through the process.
Listed below are our top three DIY methods for cleaning limescale from shower glass.
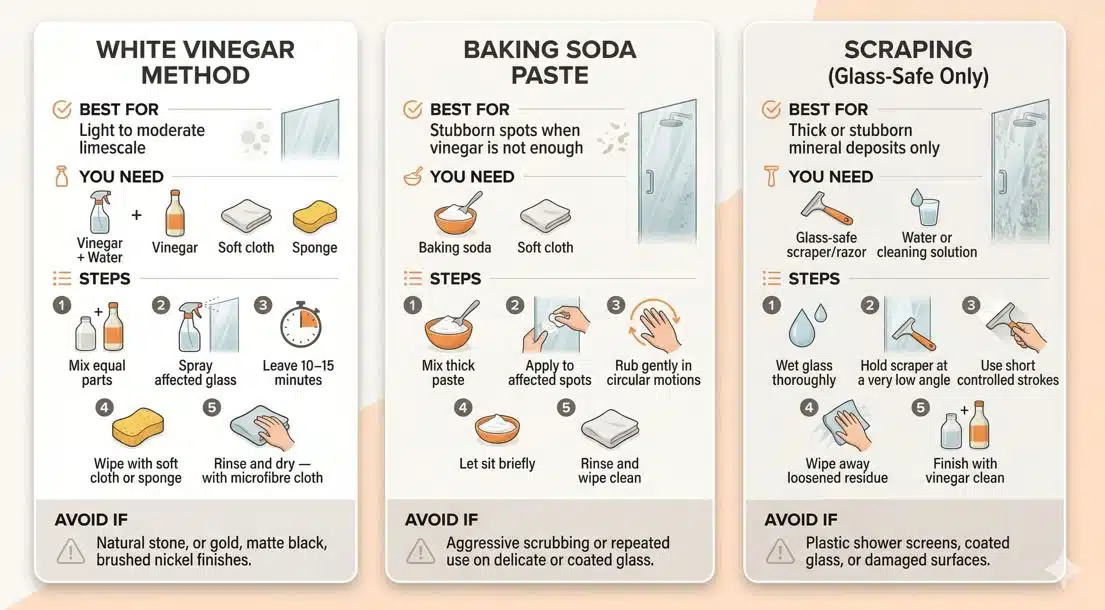
1. White Vinegar Method
White vinegar is one of the most common household cleaners and is highly effective at dissolving limescale. Its mild acidity helps break down mineral deposits without damaging glass surfaces.
What you need:
- White vinegar
- Water
- Spray bottle
- Soft cloth or sponge
Steps:
- Pour equal parts white vinegar and water into a spray bottle and shake well to combine the ingredients.
- Spray the solution generously over the shower screen, making sure all affected areas have been saturated.
- Allow it to sit for at least 10–15 minutes so the mineral build-up can be broken down.
- Wipe the surface using a soft cloth or non-abrasive sponge, applying a little more elbow grease to stubborn spots.
- Rinse the surface thoroughly with warm water and dry with a microfibre cloth immediately after to prevent streaks.
For best results, we recommend using this method as part of your regular bathroom cleaning routine. If the build-up is more noticeable, it’s likely bonded to the surface, so you may need to repeat the process to remove the limescale effectively.
When NOT to use it: Avoid using vinegar on natural stone surfaces or fixtures where the finish is gold-plated, matte black, or brushed nickel, as it can cause etching and long-term damage.
2. Baking Soda Paste
When your shower screen is covered in stubborn spots that aren’t coming off with vinegar or other liquid cleaners, baking soda is just the thing you need for its cleansing properties and gentle abrasion. With some light scrubbing pressure, you’ll be able to get rid of the build-up in no time.
What you need:
- Baking soda
- Water
- Soft cloth
Steps:
- Make a thick, spreadable paste by mixing baking soda with a small amount of water.
- Use a soft cloth to apply the paste directly to the affected areas on the glass.
- Gently rub in circular motions, paying more attention to spots and streaks.
- After scrubbing, allow the paste to sit for a few minutes before rinsing thoroughly with water.
- Wipe the surface with a clean, lint-free cloth to remove any remaining residue.
This method is best used as a follow-up when vinegar alone isn’t effective (rather than as a first approach for every clean).
When NOT to use it: If the limescale isn’t coming off and you feel the need to scrub aggressively, avoid this method. Similarly, if it doesn’t show results on delicate or coated glass after the first attempt, stop, as repeated abrasion can cause fine scratches.
3. Scraping (Glass-Safe Only)
For more stubborn patches or thick mineral deposits, gently scraping the build-up off before applying a cleaning solution can help clear the glass of limescale completely. Keep in mind that this method should always be done with caution and the right technique to avoid scratching the glass.
What you need:
- Glass-safe scraper or razor blade
- Water or cleaning solution
Steps:
- Wet the glass thoroughly to soften the build-up and its grip on the surface. This also helps lower the risk of scratching.
- Hold the scraper at a very low angle against the surface (never flat or perpendicular).
- Gently scrape the limescale using short, controlled strokes.
- Wipe away loosened residue and repeat as needed.
- Finish by cleaning the glass with a vinegar solution to remove any remaining marks.
Scraping is effective but should only be used when absolutely necessary rather than as a substitute for general cleaning.
When NOT to use it: Do not use on plastic shower screens, coated glass, or any surface with existing scratches or damage.
Common Mistakes That Damage Shower Screens
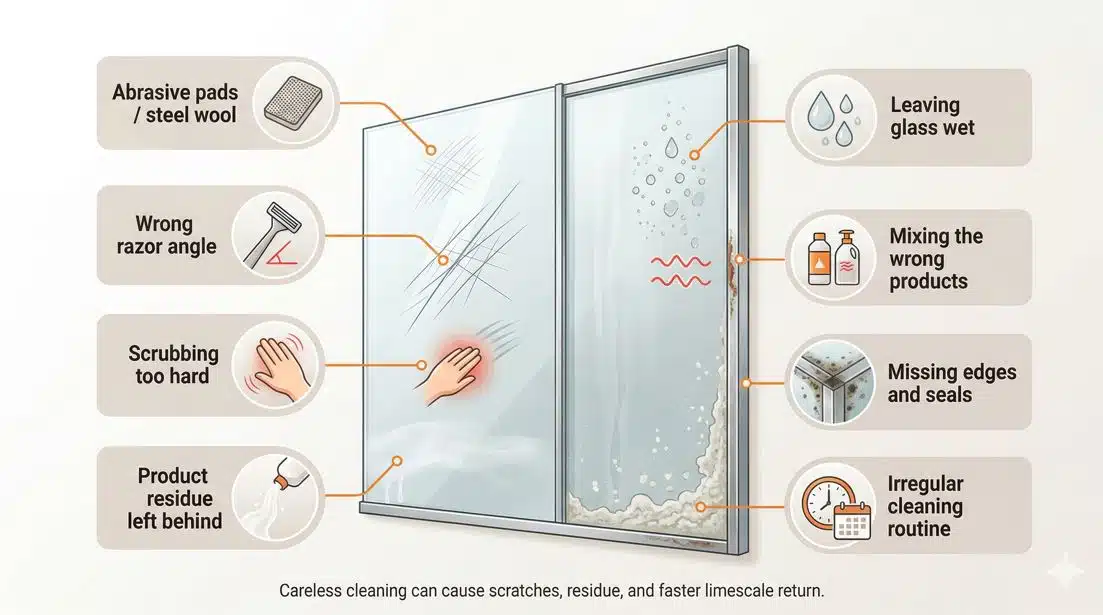
The most important thing to remember when removing limescale from shower screens is working carefully to prevent damage. Many homeowners end up adding to the problem by using the wrong tools or techniques.
Here are some common mistakes people make:
- Using abrasive pads or steel wool that leave visible scratches
- Holding a razor blade incorrectly, causing gouges in the glass
- Scrubbing too hard instead of letting cleaning solutions do the work
- Failing to rinse off cleaning products completely
- Leaving the surface wet, allowing new limescale to form quickly
- Mixing cleaning products that shouldn’t be combined
- Ignoring edges, corners, and seals where build-up often starts
- Cleaning irregularly, leading to heavier and harder-to-remove build-up
Avoiding these mistakes can save your shower screen from permanent damage and make it easier to clean over time.
How to Prevent Limescale From Coming Back
Cleaning your shower screen is only half the job; the other half is preventing limescale build-up. Fortunately, this is simple and only requires a consistent routine to keep your shower screen clear with minimal effort.
Here’s what you can do:
- After-shower habits:
- Rinse the glass with clean water to remove soap scum and minerals
- Use a squeegee or cloth to wipe down the screen
- Leave the bathroom ventilated to dry surfaces quickly
- Weekly habits:
- Wipe the screen with a mild cleaning solution or diluted vinegar
- Address early signs of limescale before they become stubborn
- Monthly habits:
- Do a more thorough clean of the entire shower area
- Pay attention to corners and edges where build-up accumulates
These small habits may only take a few minutes, but they significantly reduce the need for frequent deep cleaning.
DIY vs Professional Bathroom Cleaning
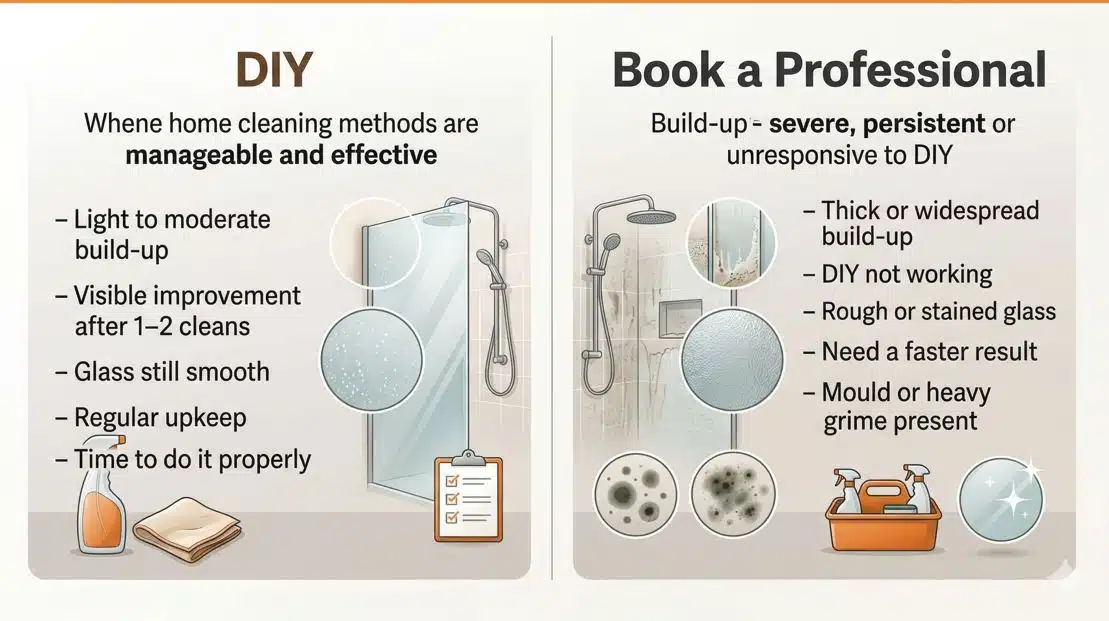
DIY cleaning works well when you’re dealing with fresh or moderate limescale build-up. However, understanding when home methods can help and when they can’t will save you hours on a problem that requires a different approach, often the work of a professional.
When to Do-it-Yourself:
- The limescale is light or moderate
- You can see improvement after one or two cleaning attempts
- The surface is still smooth and undamaged
- You’re maintaining a regular cleaning routine
- You have the time to clean properly rather than hastily
When to Book a Professional:
- The limescale is thick, crusted, or widespread
- DIY methods aren’t showing visible results
- The glass feels rough or looks permanently stained
- You want a faster, more reliable result
- There are additional issues like mould or heavy grime
A professional General Cleaning service can take care of deep bathroom cleaning tasks, including removing built-up limescale from shower screens. To ensure your bathrooms are well-maintained thereafter, Regular Cleaning is a must, especially if you want to prevent limescale from becoming
Limescale is much easier to manage when it’s dealt with early. One of the best tips our experts recommend is a quick rinse and wipe after you shower to prevent build-up from forming in the first place. Stay consistent with simple habits, and you’ll spend far less time scrubbing and far more time enjoying a clean, clear shower screen!

Adriana Aziz is the operations manager at MaidForYou. With over 6 years of experience managing cleaning operations, she knows all the best hacks when it comes to cleaning residential and commercial buildings. With expert experience in managing house cleaning operations, interior design and logistics. She spends her free time with her family and as a freelance food critic.
As seen on...


We’re Committed To 200% Customer Satisfaction Each And Every Time
If you’re not happy with our work, we make it right!


Be the first to comment.